User Guide
- Introduction
- How To Use This User Guide
- About This Document
- Installation Guide
- User Interface (UI) of Tutor Master
- Quick Start
-
Features
-
Students
- Adding a student:
student -a - Viewing a student:
student -v - Editing a student:
student -e - Deleting a student:
student -d - Listing all students :
list - Locating students by name:
student -f - Adding a lesson to a student:
student -al - Deleting a lesson from a student:
student -dl - Adding an exam to a student:
student -ae - Deleting an exam from a student:
student -de
- Adding a student:
- Groups
-
Tasks
- Adding a task:
task -a - Editing a task:
task -e - Deleting a task:
task -d - Finding a task by name:
task -f - Listing all tasks:
task -l - Assigning tasks to students:
task -as - Assigning tasks to groups:
task -ag - Unassigning tasks from students:
task -unas - Unassigning tasks from groups:
task -unag - Marking a task as done by student:
task -do - Marking a task as done by group:
task -dog(Coming soon) - Marking a task as not done by student:
task -undo - Marking a task as not done by group:
task -undog(Coming soon)
- Adding a task:
- Others
-
Students
- FAQ
- Command summary
Introduction
Tutor Master is a desktop application for freelance tutors to store and look up their students’ details, group them together based on their lessons and create tasks to assign to students individually or in groups. Tutor Master aims to help you manage your commitments and workload to focus on providing a better coaching for their students. It is optimised for use via a Command Line Interface (CLI) which requires you to simply type and enter commands to use the application. Our application also includes a Graphical User Interface (GUI) which makes it easy for you to interact with the interface by scrolling and clicking on buttons.
How To Use This User Guide
- Install Tutor Master by following the instructions in the Installation Guide.
- To get familiar with the User Guide, you can refer to About This Document.
- Get familiar with the various components of the app by referring to the User Interface Guide.
- If you are a new user, you can follow our guide in Quick Start to familiarise yourself with the app.
- If you are familiar with the app, you can refer to the Features section to see details of all commands or look at Command Summary to see all commands easily.
- Refer to our FAQ if you have any questions.
About This Document
| Symbol | Explanation |
|---|---|
command |
A blue highlight (called a mark-up) indicates a command or a parameter that can be typed into the Command Panel and executed by Tutor Master |
| This symbol indicates additional information about the heading or subheading | |
| This symbol indicates crucial information you should be aware of when using Tutor Master |
Installation Guide
-
Ensure you have Java 11 or above installed in your Computer. You can also install it here.
-
Download the latest tutormaster.jar here.
-
Copy the file to the folder you want to use as the home folder for your Tutor Master.
-
To open the application,
- If you are a Mac user, open Terminal and navigate to the directory with Tutor Master. Type
java -jar tutormaster.jarand run the command. - If you are Windows user, double-click the jar file to start the app.
- The GUI similar to below should appear in a few seconds. Note how the app contains some sample data for you to view.
- If you are a Mac user, open Terminal and navigate to the directory with Tutor Master. Type
User Interface (UI) of Tutor Master
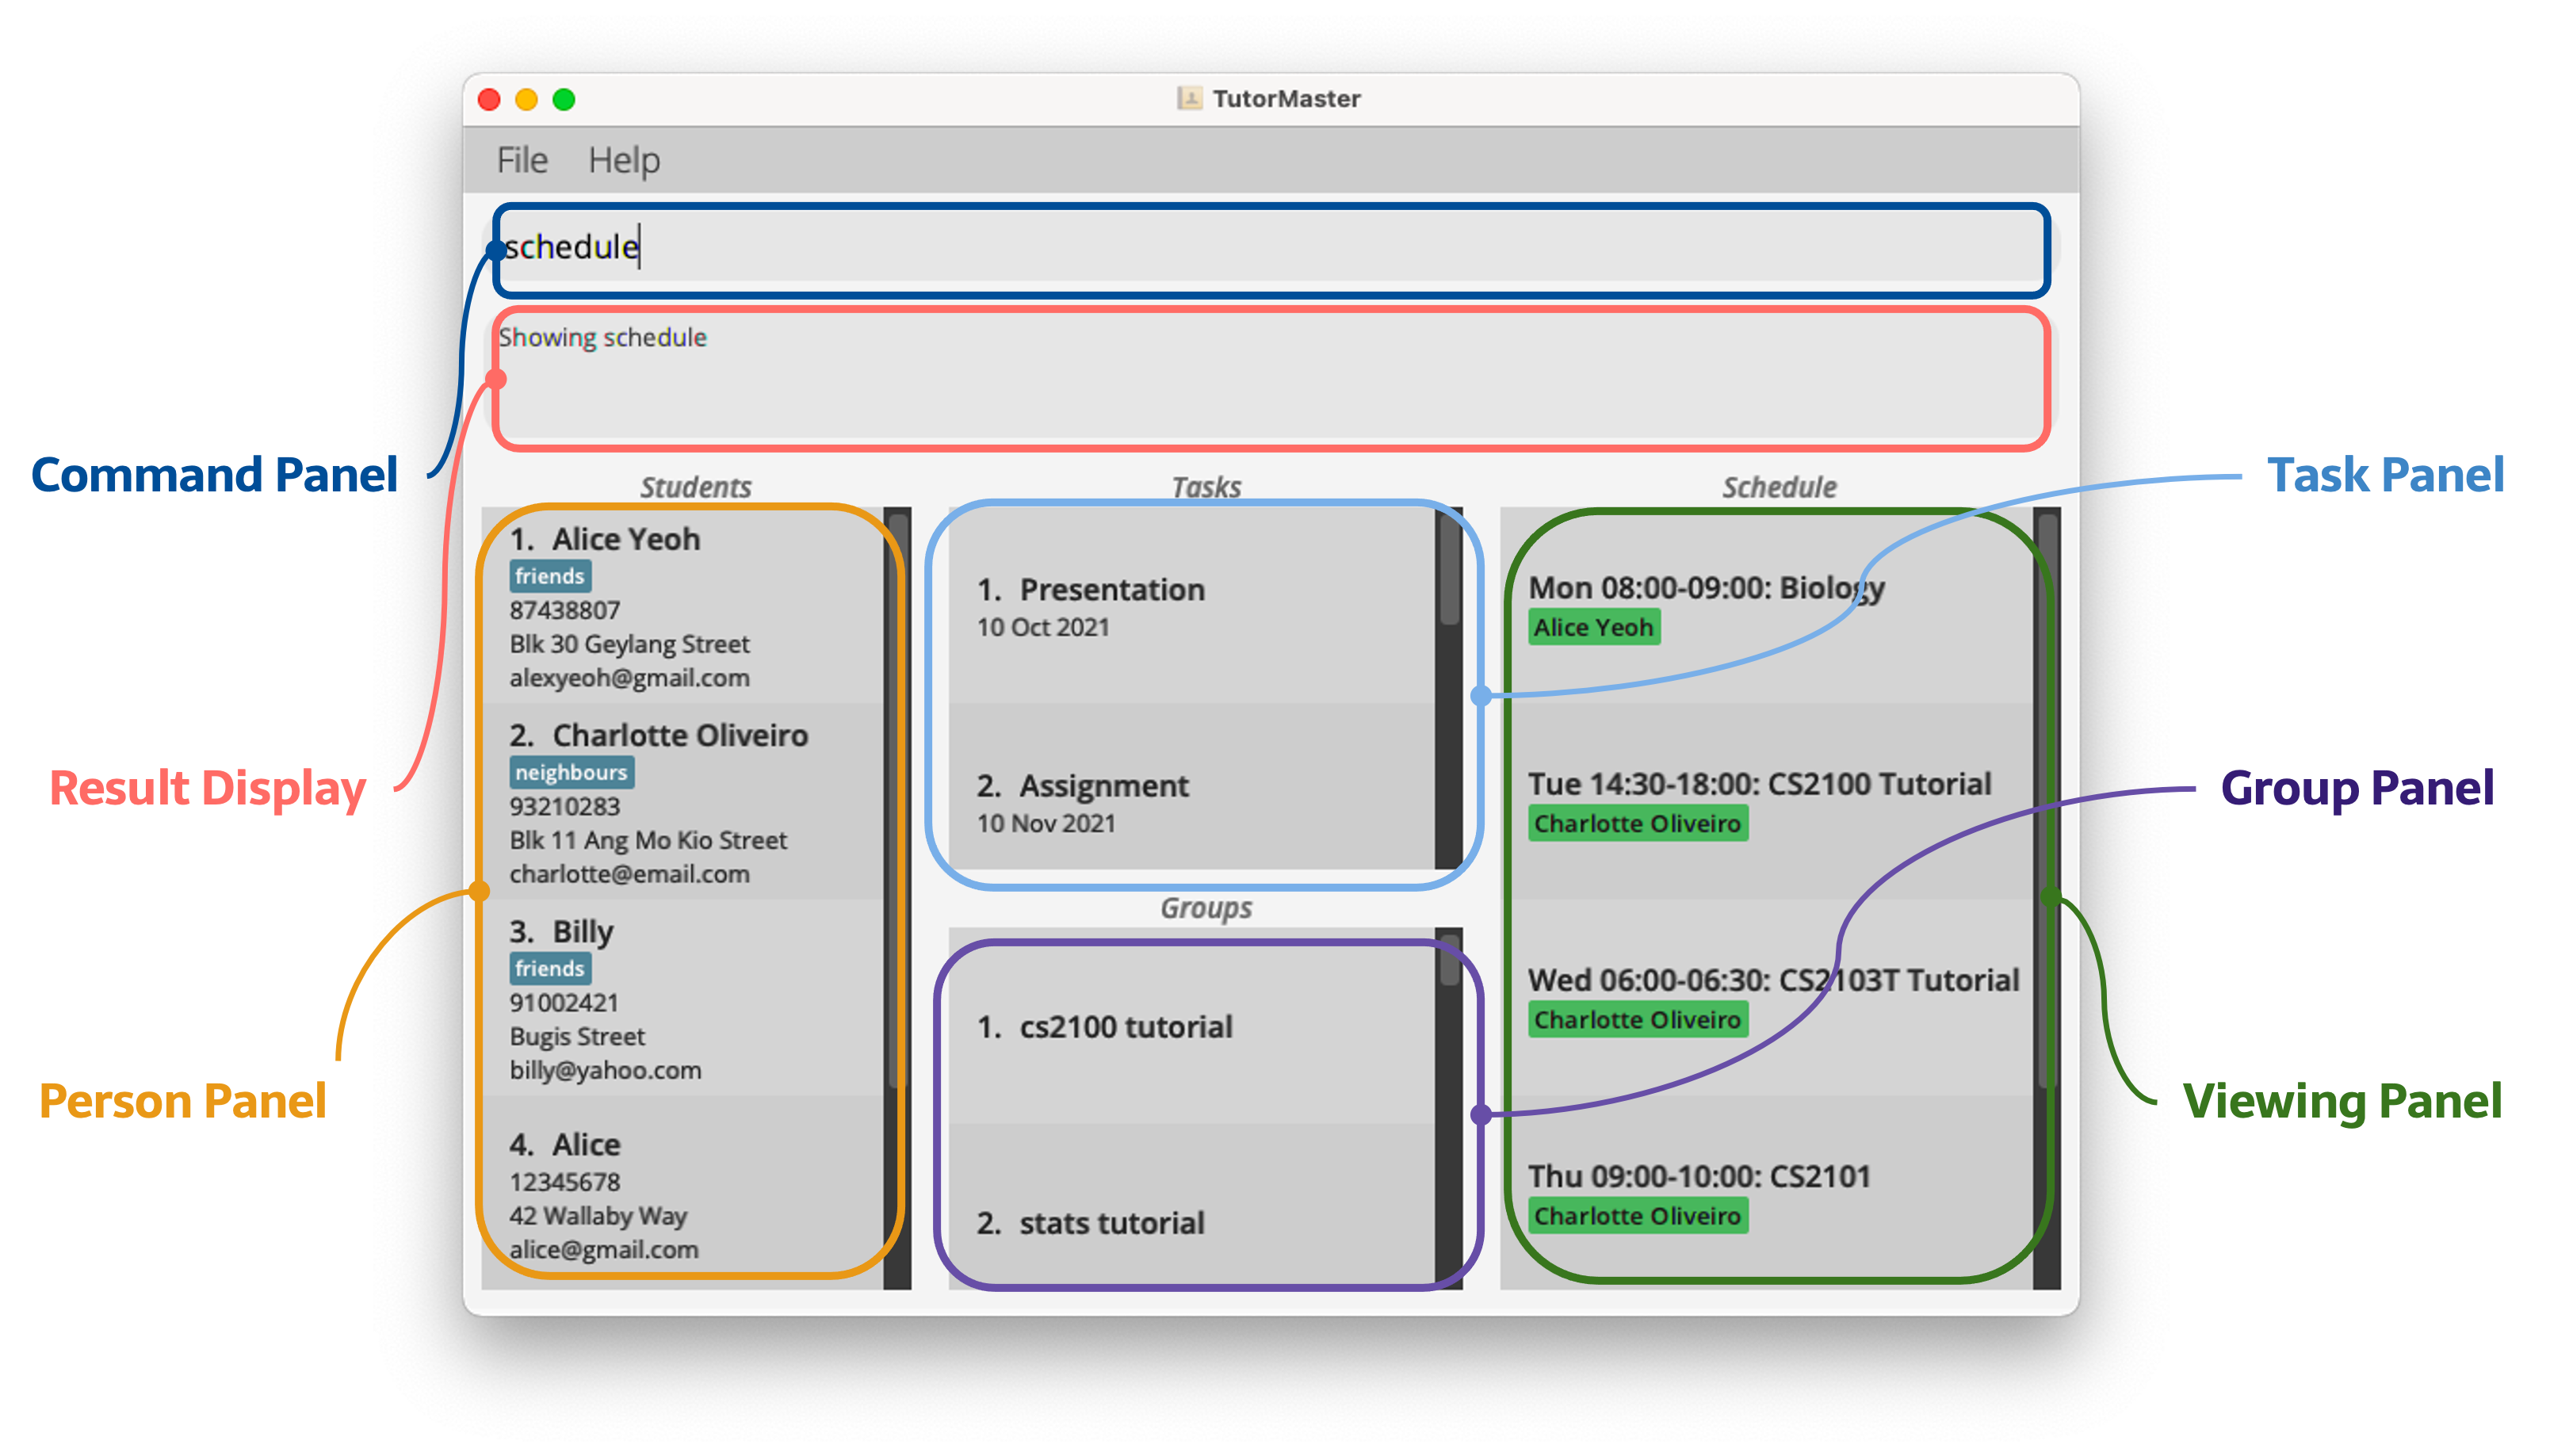
The UI consists of:
| Parts | Explanation |
|---|---|
| Command Panel | To enter commands to be executed |
| Result Display | Displays result of executed command |
| Person Panel | Displays all added students with their respective STUDENT_INDEX
|
| Task Panel | Displays all added tasks with their respective TASK_INDEX
|
| Group Panel | Displays all added groups with their respective GROUP_INDEX
|
| Viewing Panel | Displays either the schedule, group or student to be viewed |
Quick Start
Now that you have installed Tutor Master, let us give it a try!
Let us
- Create a student named “David”
- Add and assign a task named “Science Report” to “David”.
- Add him to a group named “CS2103T”
We shall type commands in the Command Panel and hit Enter to execute it.
Here are some starting commands to help you navigate around the application:
Managing Students
Since the goal is to manage students, let’s start by adding a new student to the address book. Let’s try adding a student with the following details:
- Name: David
- Phone Number: 90001111
- Email: david@gmail.com
- Address: Singapore
- Type the command
student -a n/David p/90001111 e/david@gmail.com a/Singaporeand hitEnter.- This adds a student with the details specified.
- You will now be able to see David at the entry in the Person Panel on the left,
as shown in the image below.
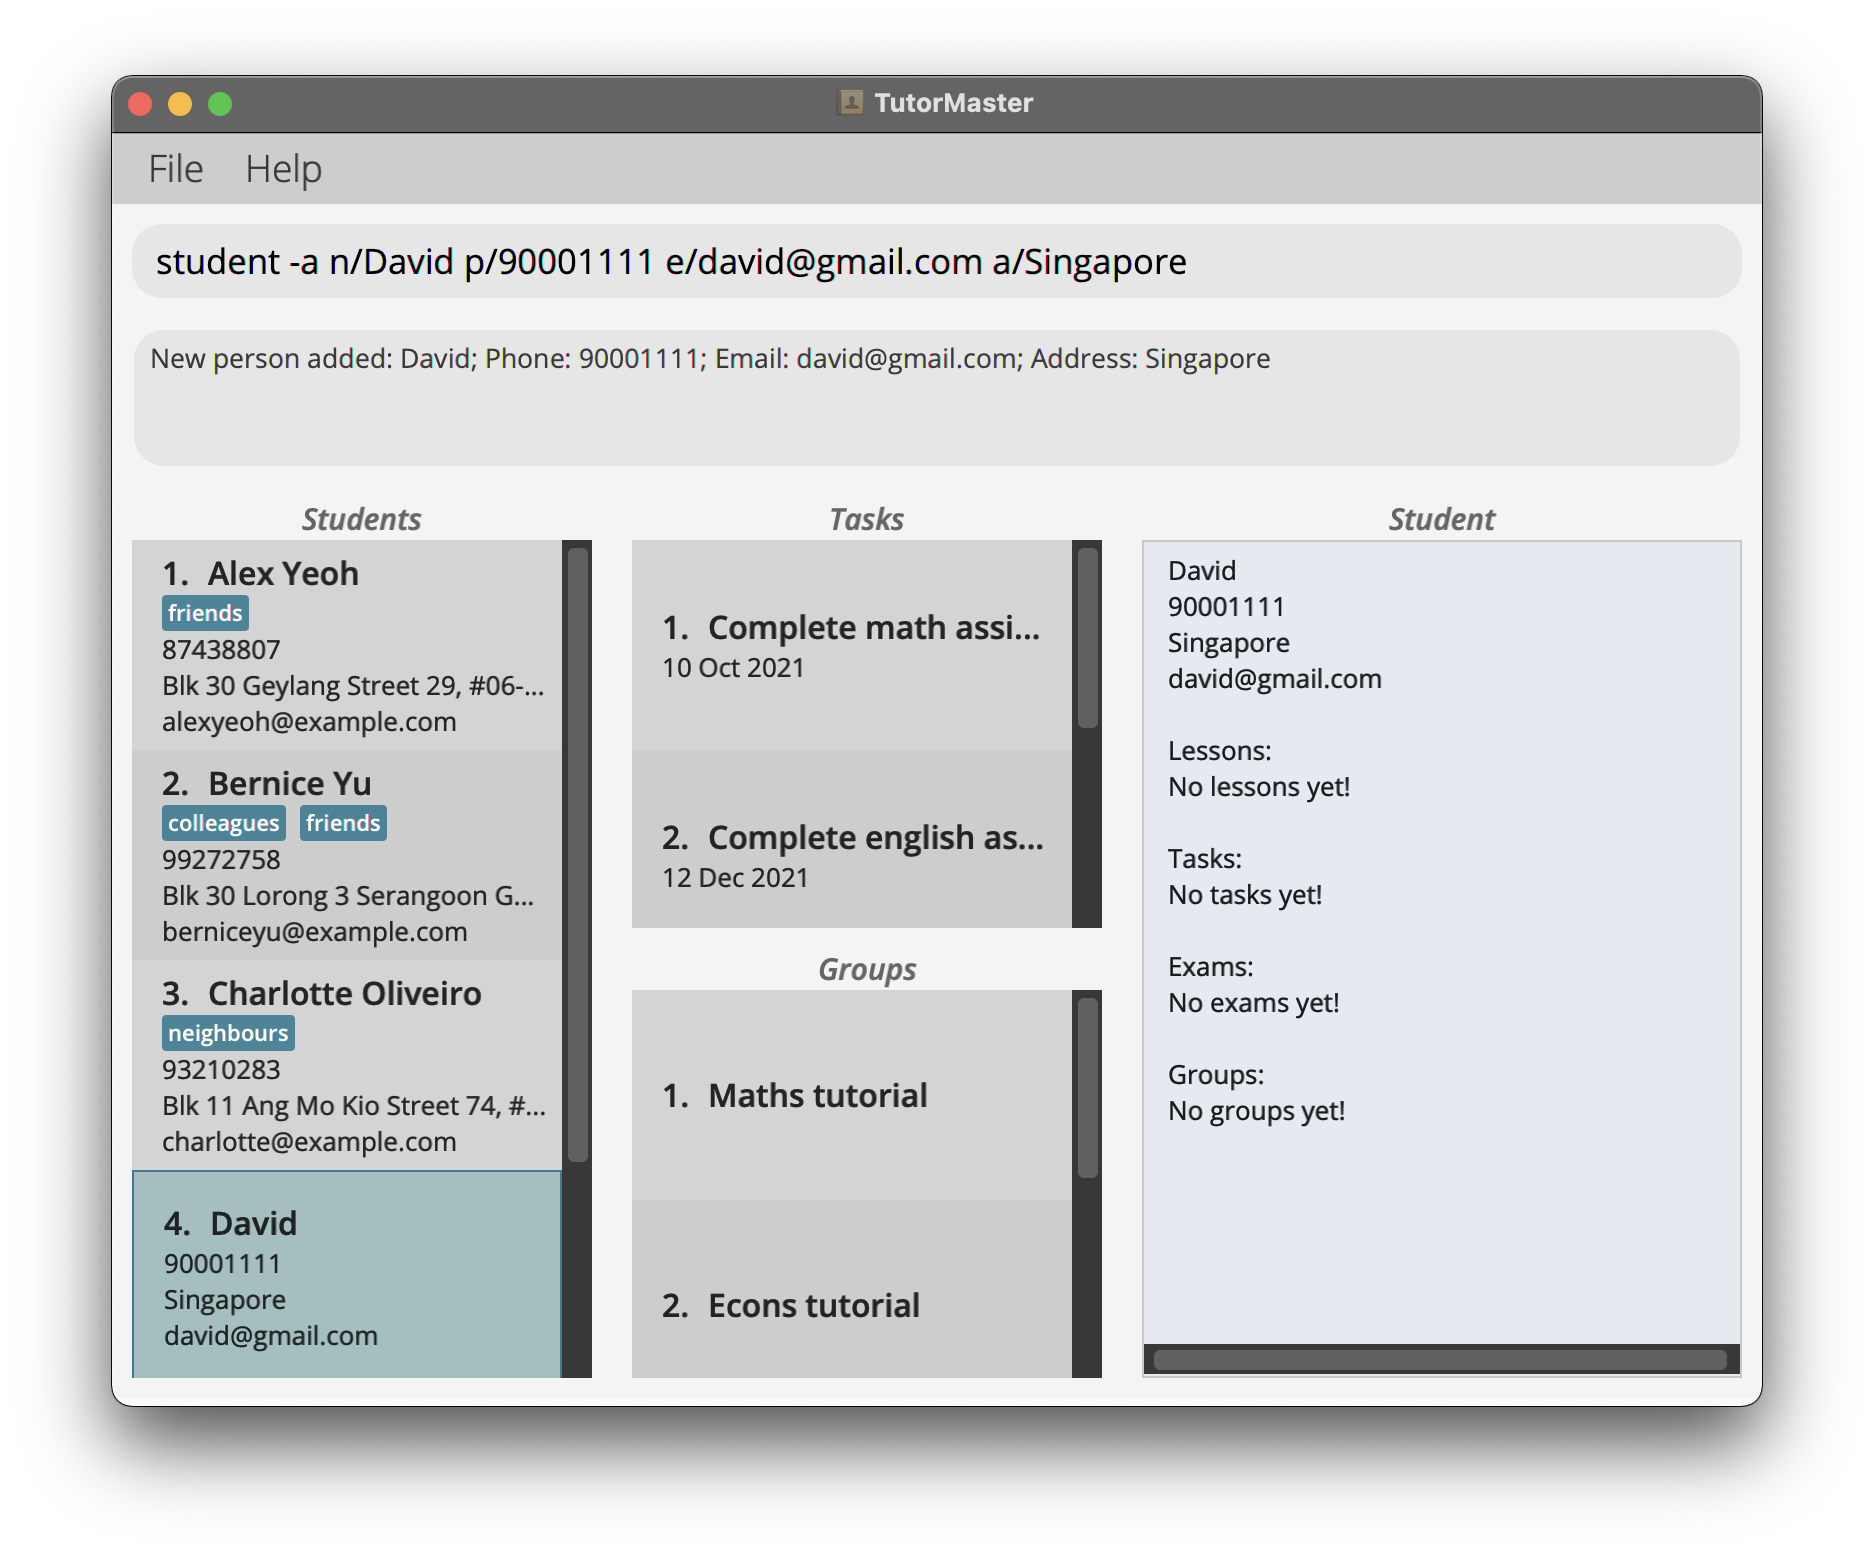
- Now lets try editing his address. Note the index number beside his name in the Person Panel, in this case it is 4.
Type the following commandstudent -e 4 a/Kent Ridgeand hitEnter.- This updates the address of David, who is at index 4 to Kent Ridge.
- Note that the other details are unchanged, you can choose which fields you want to edit.
- You can add a lesson to David. Let’s assign a Math lesson from 10:00 to 12:00 on Friday.
Type the following commandstudent -al 4 s/Math st/10:00 et/12:00 d/Friand hitEnter.- This adds a lesson to David with the given details.
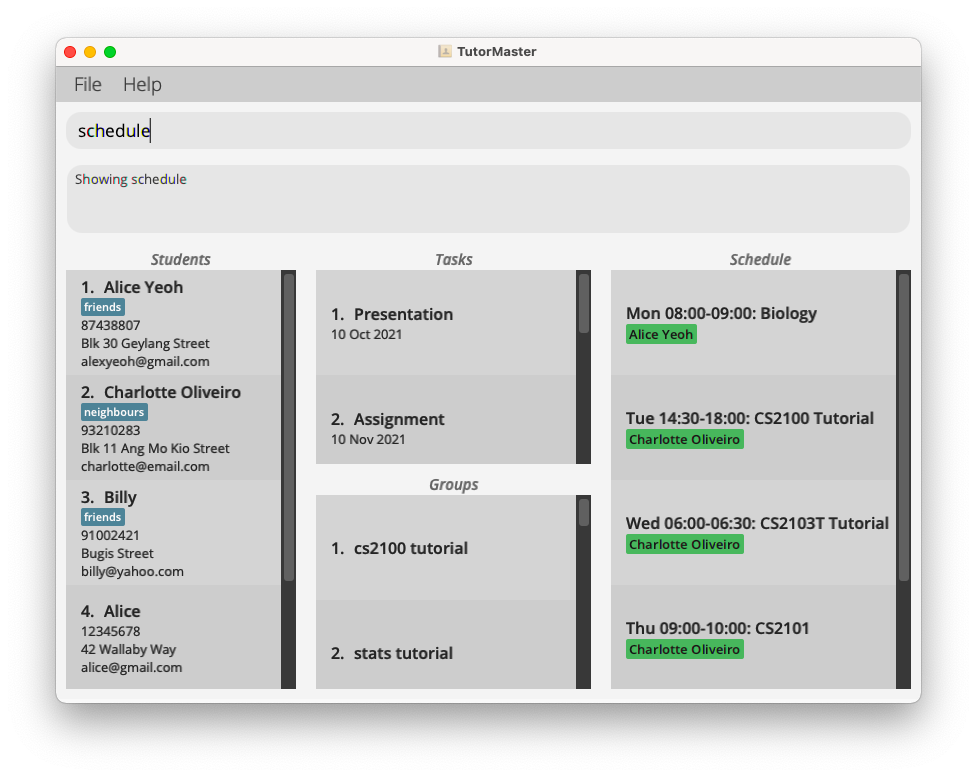
- You can view your schedule for the week by entering
schedule, try it!
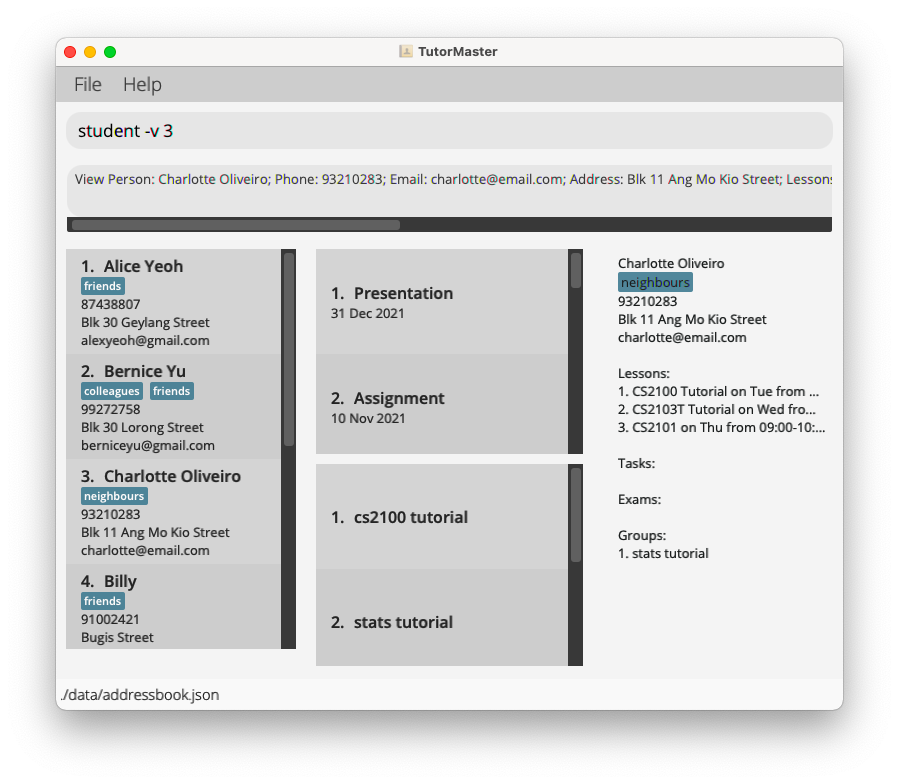
- If you wish to view more details of a student, you can use the student view command.
Typestudent -v 4in the Command Panel and hitEnter.- This displays the student at
STUDENT_INDEX4 in the Viewing Panel.
- This displays the student at
Managing Tasks
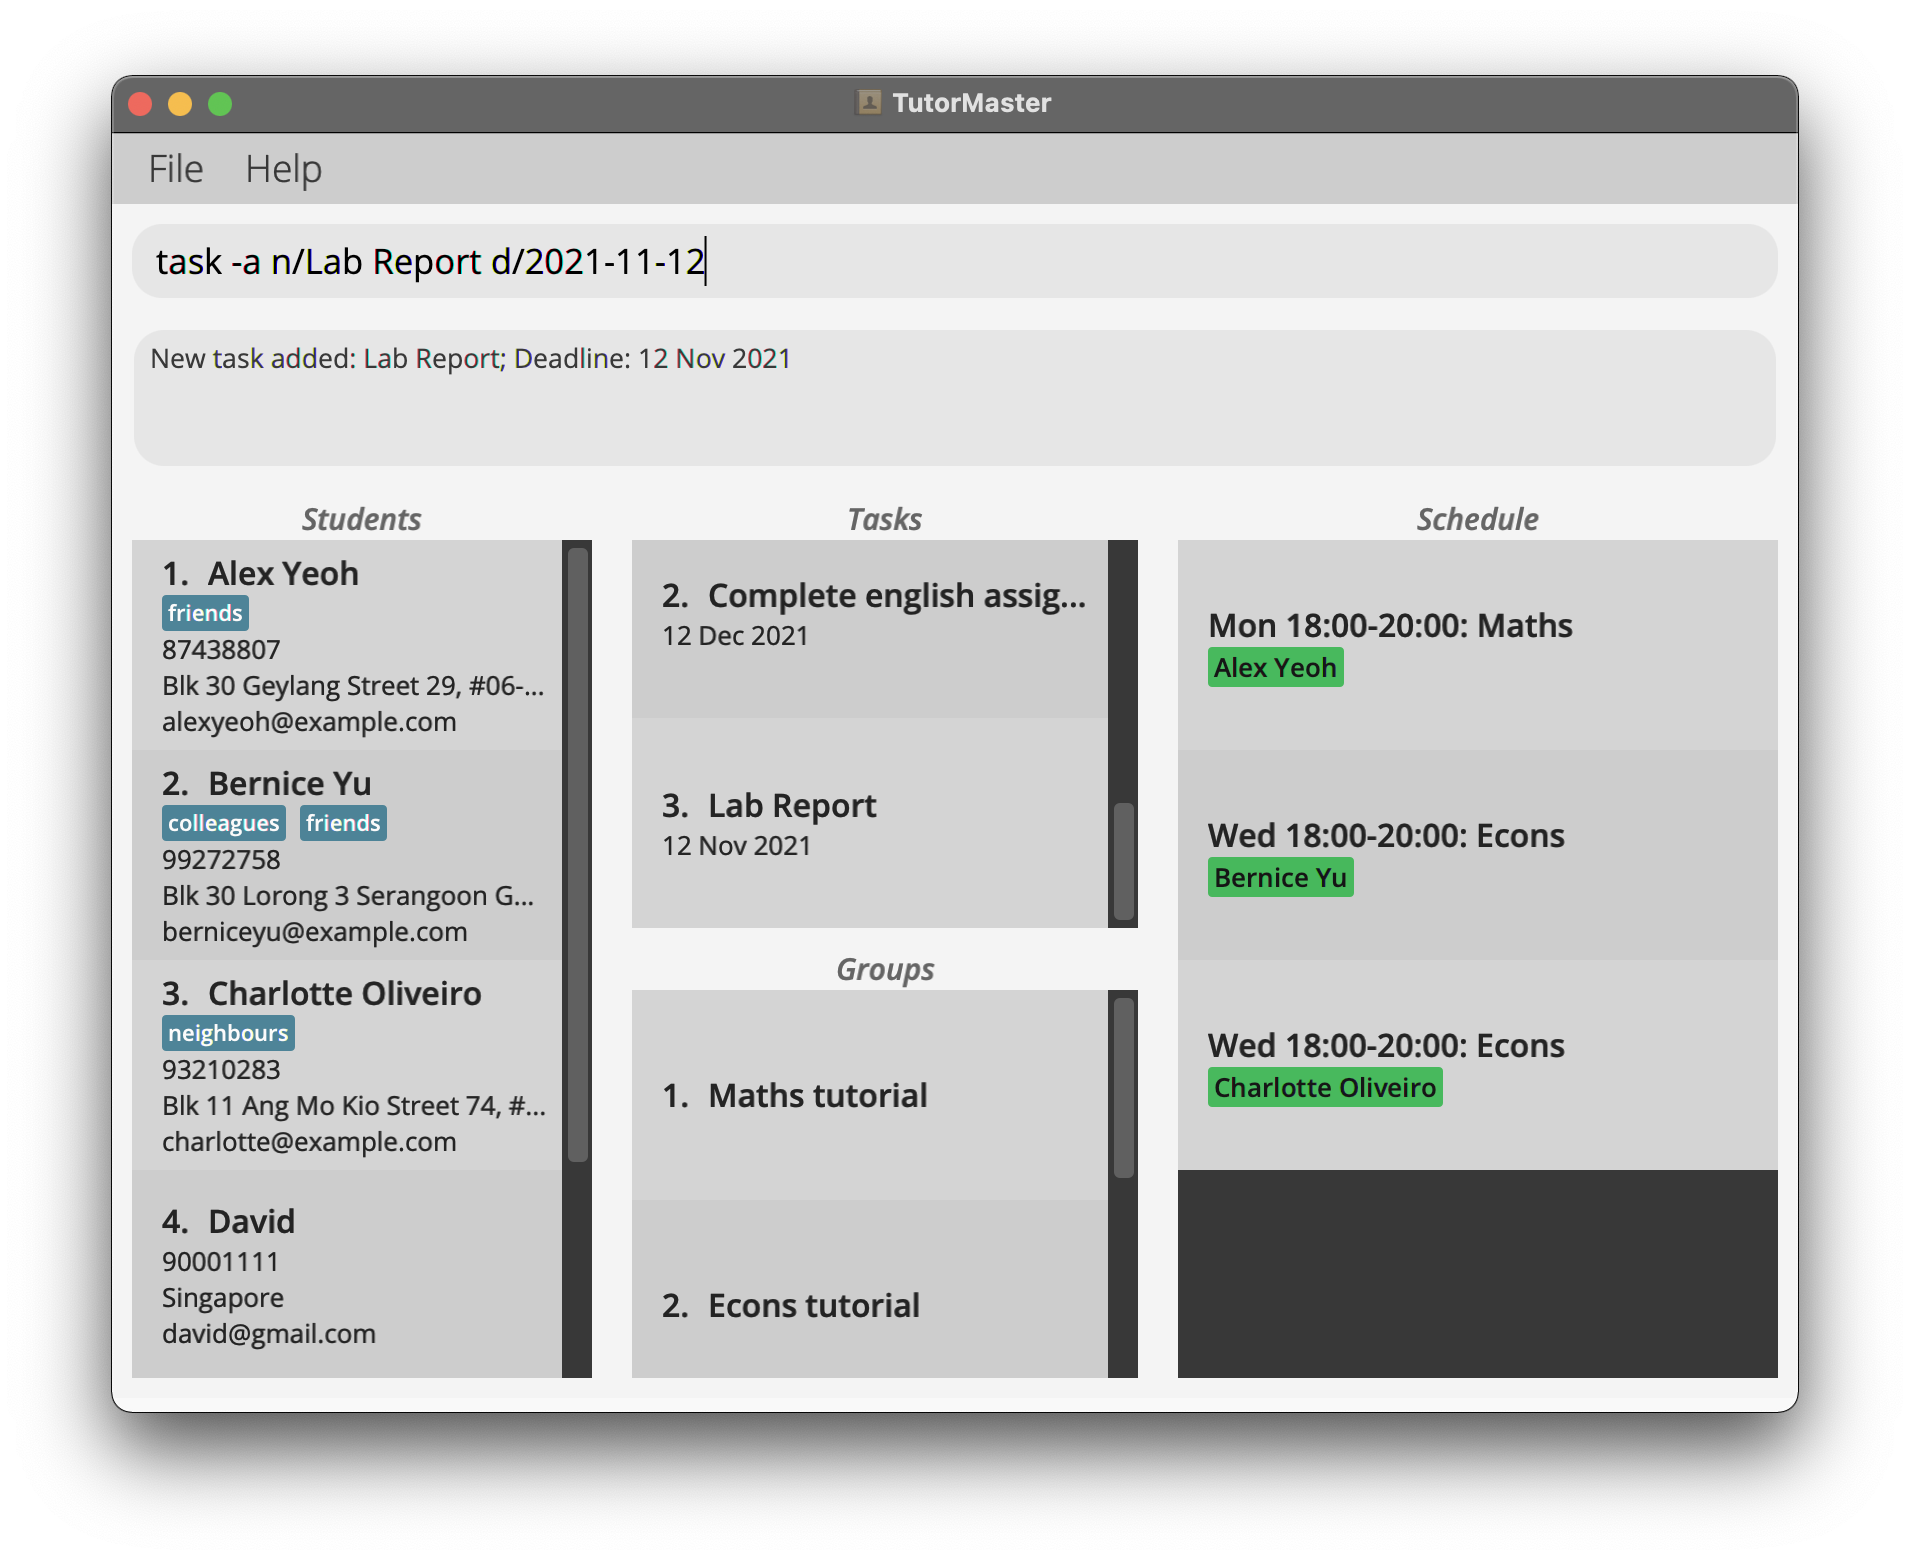
Next, let us add a task with description Lab Report and deadline 12 November 2021.
- Type the command
task -a n/Lab Report d/2021-11-12in the Command Panel and hitEnter.- This adds a task with the details specified above.
- You should now see Lab Report in the Task Panel in the middle column as shown in the image below.
- Now, let us try editing the description of the task to Science Report. Note the index of the task in the Task Panel,
which is 3 in this case. Type
task -e 3 n/Science Reportin the Command Panel and hitEnter.- This updates the description of the task at index 3 to Science Report.
- The description remains unchanged.
- You can also assign this task, Science Report to David.
- Take note of the index of the task you would like to assign and the index of the student to whom the task should be assigned. In this case, the index of Science Report is 3 while the index of David is 4.
- Type the command
task -as 4 3in the Command Panel and hitEnter. - This assigns Science Report to David.
Managing Groups
Let us now add “David” to a group named “CS2103T”.
- Type
group -a 4 n/CS2103Tin the Command Panel and hitEnter.- This creates a group named CS2103T and includes David who is at
STUDENT_INDEX4 in the Person Panel. -
CS2103T is now added to the Group Panel. It has an
GROUP_INDEXof 3 in the Group Panel. - This group currently has David inside
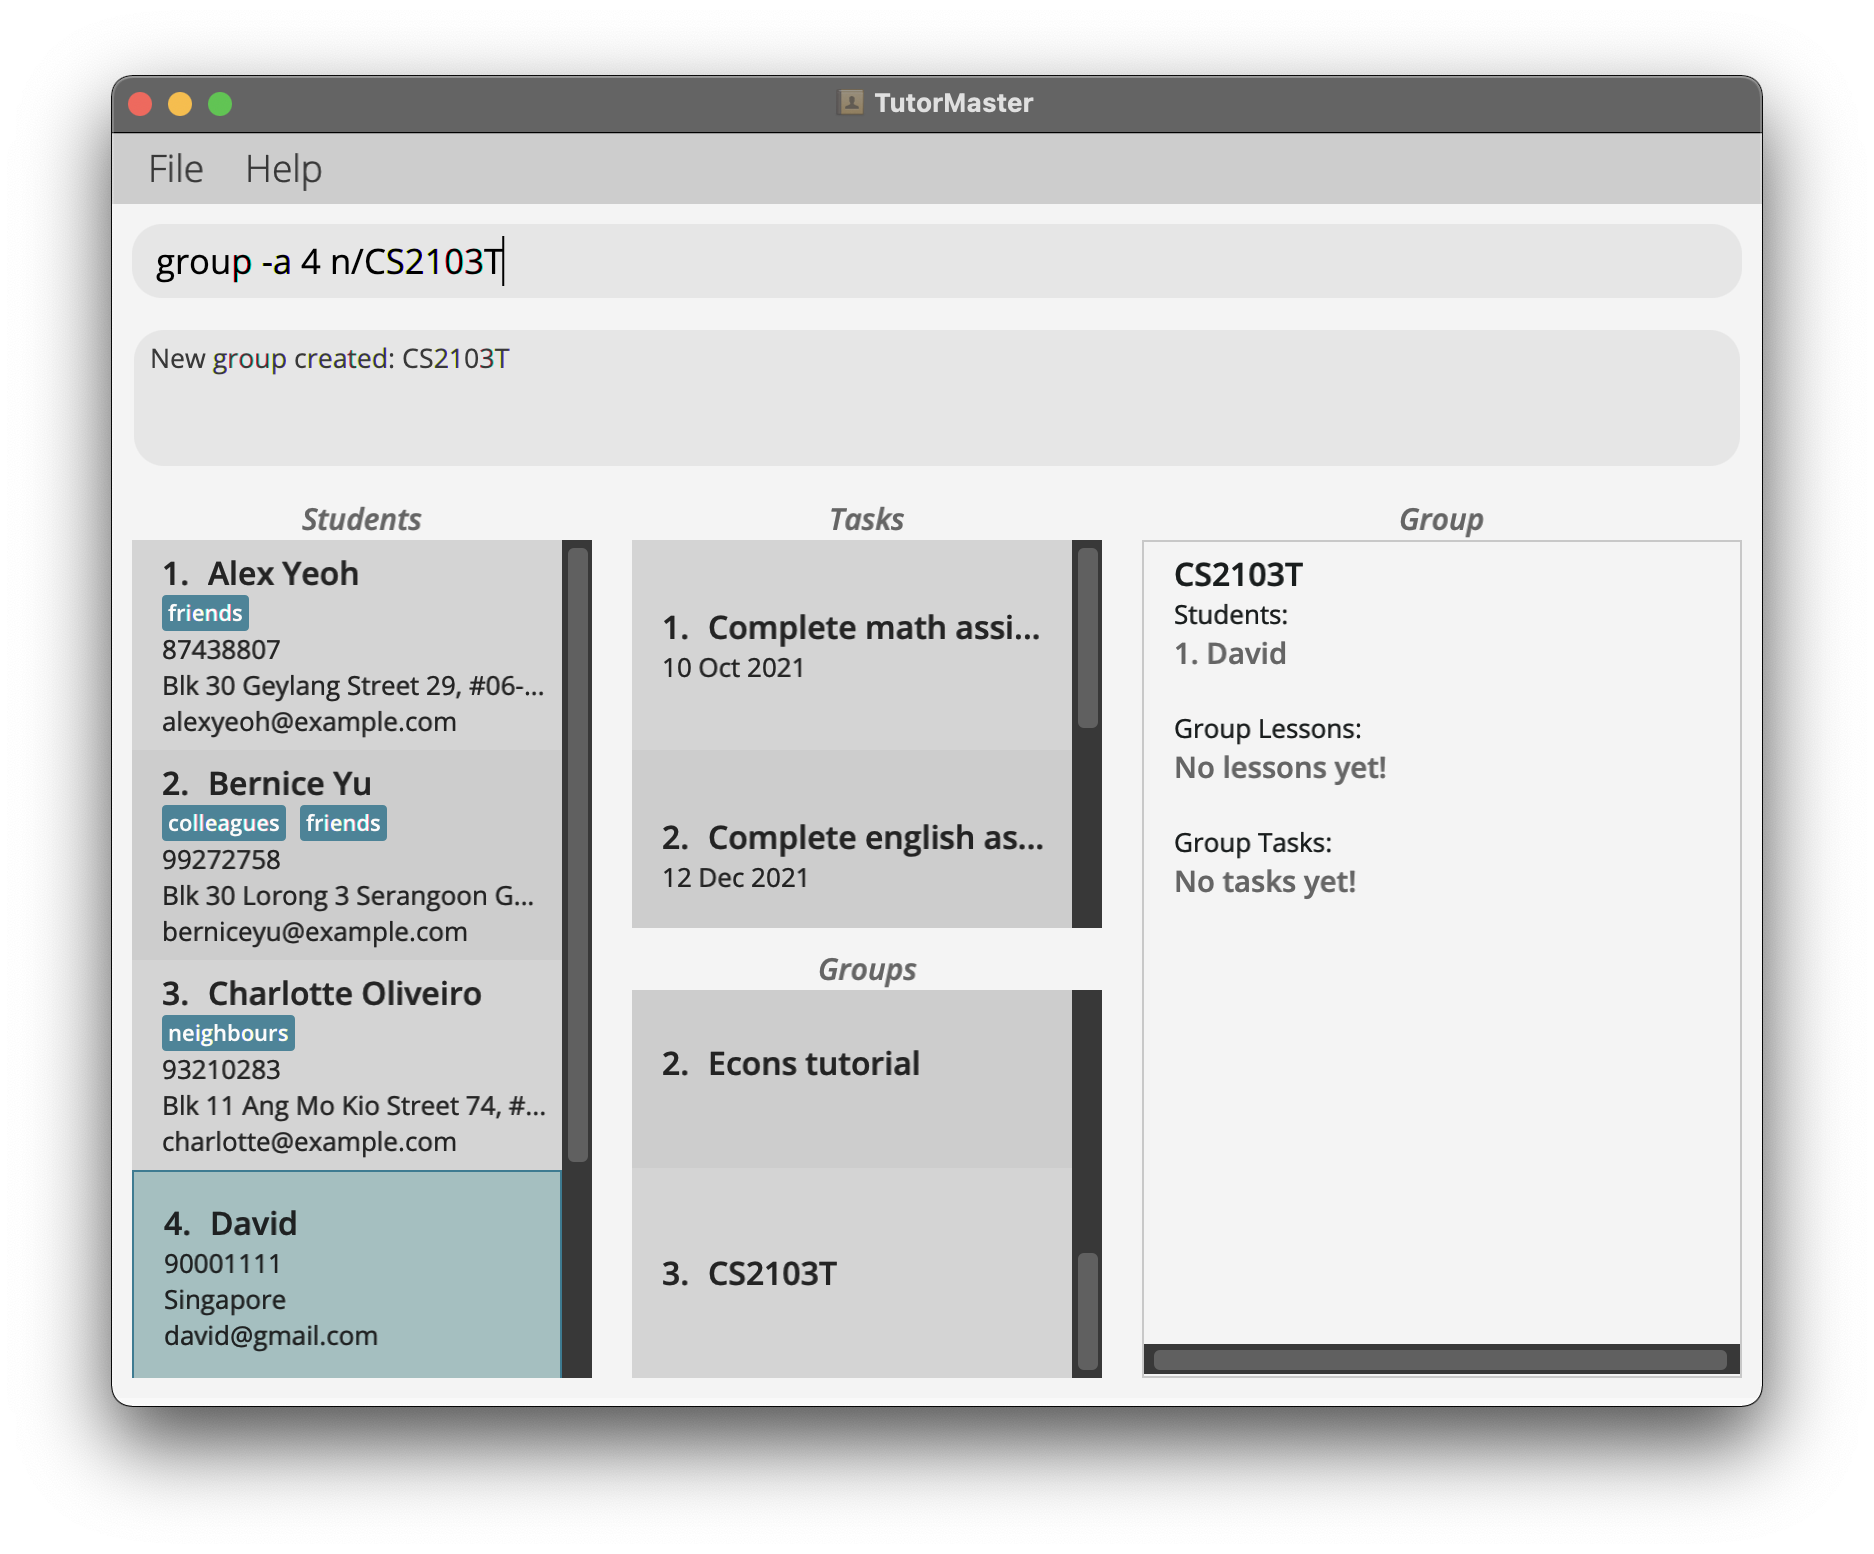
- This creates a group named CS2103T and includes David who is at
- Type
group -v 3in the Command Panel and hitEnter.- This displays the details of the group at
GROUP_INDEX3 in the Viewing Panel.
- This displays the details of the group at
You can refer to the Features below for details of each command.
Features
![]() Notes about the command format:
Notes about the command format:
- Words in
UPPER_CASEare the parameters to be supplied by the user.
- e.g. in
add n/NAME,NAMEis a parameter which can be used asadd n/John Doe.
- e.g. in
-
Items in square brackets
[]are optional.
e.gn/NAME [t/TAG]can be used asn/John Doe t/friendor asn/John Doe. -
Items with
… after them can be used multiple times including zero times.
e.g.[t/TAG]…can be used ast/friend,t/friend t/familyetc. -
Parameters can be in any order.
e.g. if the command specifiesn/NAME p/PHONE_NUMBER,p/PHONE_NUMBER n/NAMEis also acceptable. -
If a parameter is expected only once in the command but you specified it multiple times, only the last occurrence of the parameter will be taken.
e.g. if you specifyp/12341234 p/56785678, onlyp/56785678will be taken. -
Extraneous parameters for commands that do not take in parameters (such as
help,list,exitandclear) will be ignored.
e.g. if the command specifieshelp 123, it will be interpreted ashelp. -
INDEXparameters are very common in this application. Ensure that they are a positive integer and is less than 2,147,483,648.
Students
Adding a student: student -a
Adds a student to the Person Panel.
If you have a new student to tutor, you can enter this command with their respective details to add them to the Tutor Master.
Format: student -a n/NAME p/PHONE_NUMBER e/EMAIL a/ADDRESS [t/TAG]…
- Adds a student with the specified
NAME -
-arefers to the add command - Two students are considered the same if all their names, phone numbers and emails are the same. It is a requirement that same students can not be added to the app simultaneously.
Examples:
-
student -a n/John p/12345678 e/john@mail.com a/42 Wallaby Way, Sydney
adds a student with the name John, phone number 12345678, email john@mail.com and address at 42 Wallaby Way, Sydney -
student -a n/Barbara p/12344321 e/barber@gmail.com a/123 Sesame Street t/graduate t/actress
adds a student with the name Barbara, phone number 12344321, email barber@gmail.com, address at 123 Sesame Street, and tags graduate and actress
Viewing a student: student -v
Views a particular student’s details in the Person Panel.
Let’s say you want to look at a particular student in detail. You can type this command to view their full name, phone number, email address, address and any other lessons, tasks, exams or groups they belong to.
Format: student -v STUDENT_INDEX
- Views the student details specified at
STUDENT_INDEX.STUDENT_INDEXshould be a positive number. -
-vrefers to the view command.
Examples:
-
student -v 3view the student details at index 3.
Editing a student: student -e
Edits the details of a student in the Person Panel.
Let’s say one of your students changed their email address. You can edit the particular student’s email address by entering the command below with the updated email address.
Format: student -e STUDENT_INDEX [n/NAME] [p/PHONE_NUMBER] [e/EMAIL] [a/ADDRESS] [t/TAG]…
- Edits the details of the student specified by the
STUDENT_INDEX.STUDENT_INDEXshould be a positive number and refers to the index number of a student in the Person Panel. -
-erefers to the edit command - It is a requirement that at least one of the optional fields should be provided.
Example:
-
student -e 3 p/88888888 e/johnny@mail.comedits the phone number and email address of the third student in the Person Panel to 88888888 and johnny@mail.com respectively.
Deleting a student: student -d
Deletes the specific student in the Person Panel.
If you happen to not teach a particular student anymore, you can enter this command to delete the student. Executing this command will also remove the student from any groups they are in.
Format: student -d STUDENT_INDEX
- Deletes the student specified by the
STUDENT_INDEX. -
-drefers to the edit command -
STUDENT_INDEXshould be a positive number and refers to the index number of a student in the Person Panel.
Examples:
-
student -d 3deletes the third student in the Person Panel
Listing all students : list
Shows a list of all students in the Person Panel.
Format: list
Locating students by name: student -f
Finds students whose names contain any of the given keywords.
Suppose you would like to further edit or manage a students’ details, you can narrow down list of students in the Person Panel to only display students that you search for.
Format: student -f KEYWORD…
- The search is case-insensitive. e.g
hanswill matchHans - The order of the keywords does not matter. e.g.
Hans Bowill matchBo Hans - Only the name is searched.
- Only full words will be matched e.g.
Hanwill not matchHans - Students matching at least one keyword will be returned (i.e.
ORsearch). e.g.Hans Bowill returnHans Gruber,Bo Yang
Examples:
-
student -f JohnreturnsjohnandJohn Doe -
student -f alex davidreturnsAlex Yeoh,David Li
Adding a lesson to a student: student -al
Adds a lesson to a student.
Let’s say you would like to note down your lesson schedule with your student, you should specify the lesson subject, as well as the day of week and time of the lesson.
Format: student -al STUDENT_INDEX s/SUBJECT st/START_TIME et/END_TIME d/DAY
- Adds a lesson to the student specified by the
STUDENT_INDEX. -
SUBJECTtakes in any input with at least one alphanumeric character. -
DAYtakes in the following inputs:Mon Tue Wed Thu Fri Sat Sun. -
START_TIMEandEND_TIMEtakes in the time in 24-hour, HH:MM, format. For example08:00for 8am.
![]() Overlapping lessons:
Overlapping lessons:
- The same student cannot be allocated to multiple lessons that are overlapping. Overlap is defined as being on the same day and within the same time frame.
- However, lessons of different students can still overlap. This may be disallowed in a future version.
Example:
-
student -al 1 s/Biology st/08:00 et/09:00 d/Monadds a lesson with the subject name biology starting at 8am and ending at 9am on Mondays.

Deleting a lesson from a student: student -dl
Deletes a lesson from the specific student.
If you are not continuing a student’s lesson anymore, you can enter this command to remove the lesson from your schedule.
Format: student -dl STUDENT_INDEX LESSON_INDEX
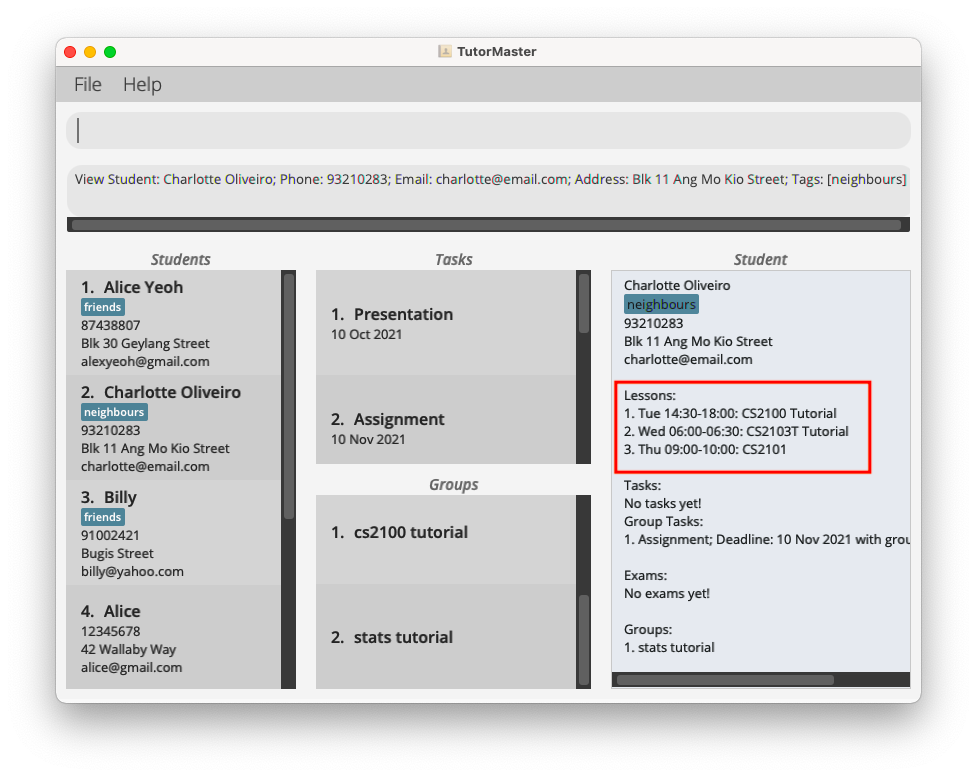
- Specifies the student at
STUDENT_INDEX. - Deletes the specified lesson at
LESSON_INDEXof the student specified. - Both
STUDENT_INDEXandLESSON_INDEXmust be a positive number. - The
LESSON_INDEXcan be found by using the student viewing command as shown below.
Example:
-
student -dl 1 1deletes the first lesson from the first student.
Adding an exam to a student: student -ae
Adds an exam to the specific student.
If you would like to note down one of your student’s exam dates, you should specify the date and time of the exam as well as the subject that the exam is for.
Format: student -ae STUDENT_INDEX s/SUBJECT d/DATE_TIME
- Adds an exam to the student specified by the
STUDENT_INDEX. -
SUBJECTtakes in any input with at least one alphanumeric character. -
DATE_TIMEtakes in a date and time in the following format:yyyy-MM-dd HH:mm. - There are currently no restrictions on
DATE_TIME, please ensure that the exam dates are correct.
Example:
-
student -ae 1 s/Math d/2021-12-20 14:00adds an exam with the subject name Math on 20th December 2021, 2pm.
Deleting an exam from a student: student -de
Deletes an exam from the specific student.
If you do not want to note down a particular student’s exam anymore, you can remove it by entering this command.
Format: student -de STUDENT_INDEX EXAM_INDEX
- Specifies the student at
STUDENT_INDEX. - Deletes the specified exam at
EXAM_INDEXof the student specified. - Both
STUDENT_INDEXandEXAM_INDEXmust be a positive number. - The
EXAM_INDEXcan be found by using the student viewing command, similarly to deleting lessons.
Example:
-
student -de 1 1deletes the first exam from the first student.
Groups
Grouping students: group -a
Group students together.
This is useful for when you have a group of students that has the same lesson schedule or tasks to complete.
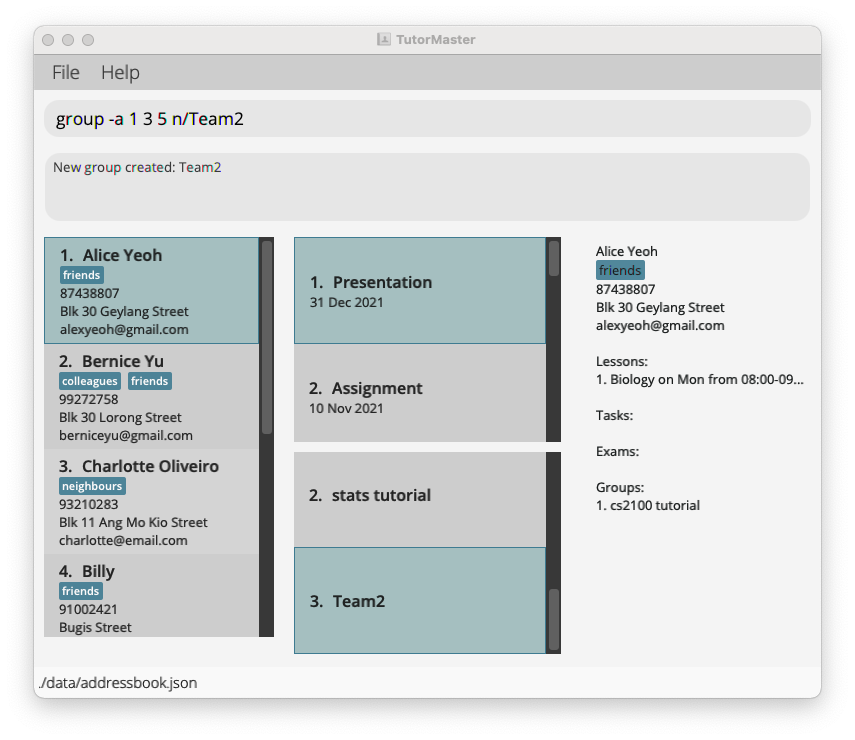
Format: group -a STUDENT_INDEX… n/GROUPNAME
- Groups students into a group specified at
GROUPNAME -
-arefers to the add group command - You can specify as many student index numbers as required.
- The student index refers to the student index number shown in the displayed Person Panel.
- The student index must be a positive integer 1, 2, 3, …
Examples:
-
group -a 1 3 5 n/Team2creates a group “Team2” that includes students at index 1, 3 and 5.
Viewing a group: group -v
Views a group of students.
Let’s say you want to look at all the students inside one of your groups. Instead of viewing each student individually to see the group they are in, you can type this command to view your students, your lessons and the tasks with the group.
Format: group -v GROUP_INDEX
- Views a group of students specified at
GROUP_INDEX -
-vrefers to view group command. - The group index refers to the group index number shown in the displayed Group Panel.
- The group index must be a positive integer 1, 2, 3, …
Examples:
-
group -v 5views the group specified at the index 5.
Deleting a group: group -d
Deletes a group of students.
If you have stopped teaching a particular group of students, you can easily remove the group from the application by typing this command. This will not remove any students in the group from your Person Panel.
Format: group -d GROUP_INDEX
- Deletes a group of students specified at
GROUP_INDEX -
-drefers to delete group command. - The group index refers to the group index number shown in the Group Panel.
- The group index must be a positive integer 1, 2, 3, …
Examples:
-
group -d 5deletes the group specified at the index 5.
Adding a lesson to a group: group -al
Adds a lesson to the specific group.
If you would like to note down your lesson schedule with the entire group, you should specify the lesson subject, as well as the day of week and time of the lesson.
Format: group -al GROUP_INDEX s/SUBJECT st/START_TIME et/END_TIME d/DAY
- Adds a lesson to the group specified by the
GROUP_INDEX. -
SUBJECTtakes in any input with at least one alphanumeric character. -
DAYtakes in the following inputs:Mon Tue Wed Thu Fri Sat Sun. -
START_TIMEandEND_TIMEtakes in the time in 24-hour, HH:MM, format. For example08:00for 8am.
![]() Overlapping lessons:
Overlapping lessons:
- A group cannot be allocated a lesson if any students within the group have overlapping lessons. Overlap is defined as being on the same day and within the same time frame.
- However, lessons of different students or groups can still overlap. This may be disallowed in a future version.
Example:
-
group -al 1 s/Biology st/08:00 et/09:00 d/Monadds a lesson with the subject name biology starting at 8am and ending at 9am on Mondays.
Deleting a lesson from a group: group -dl
Deletes a lesson from the specific group.
If you are not continuing this lesson with the group anymore, you can type this command to remove the lesson from the group.
Format: group -dl GROUP_
LESSON_INDEX
- Specifies the group at
GROUP_INDEX. - Deletes the specified lesson at
LESSON_INDEXof the group specified. TheLESSON_INDEXcan be found using the group viewing command. - Both
GROUP_INDEXandLESSON_INDEXmust be a positive number.
Example:
-
group -dl 1 1deletes the first lesson from the first group.
Tasks
Adding a task: task -a
Adds a task to the Task Panel.
Let’s say, you have come up with a challenging task for your students. You may create a new task in Tutor Master by executing
the task -a command and specifying the NAME and DEADLINE of the task.
Format: task -a n/NAME d/DEADLINE
- Adds a task with the name
NAMEand deadlineDEADLINE - The deadline must be in the format
YYYY-MM-DD -
-arefers to the add command
Examples:
-
task -a n/CS2100 Lab 1 d/2021-10-10adds the task “CS2100 Lab 1”
Editing a task: task -e
Edits a task in the Task Panel.
Let’s say that the deadline for one of your tasks changed. In that case, instead of deleting the existing task and creating a new one with the updated deadline, you can simply edit the deadline of the task by typing the command below.
Format: task -e TASK_INDEX [n/NAME] [d/DEADLINE]
- Edits a task with the index
TASK_INDEX. The index should be a positive number and refers to the index number of the task in the students’ task list - The deadline must be in the format
YYYY-MM-DD -
-erefers to the edit command - It is a requirement that at least one of the optional fields should be provided!
- The current value will be updated to the value input by the user
Examples:
-
task -e 4 d/2021-12-31edits the deadline of the fourth task to 31 December 2021

Deleting a task: task -d
Deletes the specific task from the Task Panel.
Now, let us assume that all your students have completed a task and you no longer have to store it in Tutor Master. You can simply delete the task by using the command below and specifying the index of the task in the Task Panel.
Format: task -d TASK_INDEX
- Deletes the task specified at
TASK_INDEX. The index should be a positive number. -
-drefers to the deletion command. - The task index refers to the index number shown in the displayed Task Panel.
Examples:
-
task -d 1deletes the task at index 1
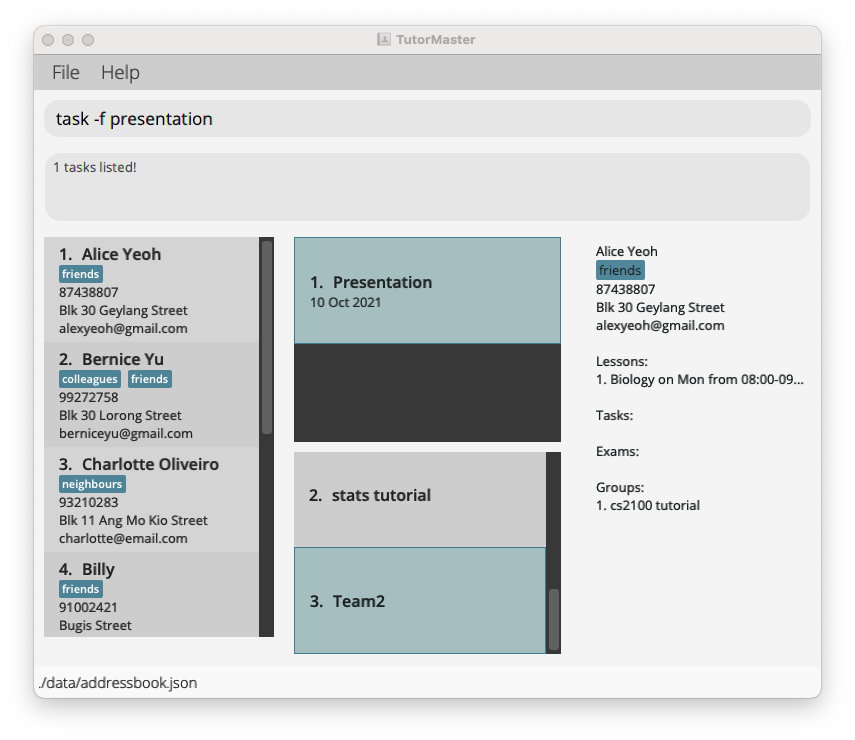
Finding a task by name: task -f
Find tasks whose names contain any of the given keywords.
Let’s say you would like to look up all the tasks with the name English. Instead of having to scroll through the long list of tasks in the Task Panel, you simply have to use the find task command and specify English as the keyword.
Format: task -f KEYWORD…
- The search is case-insensitive. e.g
reportwill matchReport - The order of the keywords does not matter. e.g.
Report Labwill matchLab Report - Only the name is searched.
- Only full words will be matched e.g.
Repwill not matchReport - Students matching at least one keyword will be returned (i.e.
ORsearch). e.g.Report Submissionwill returnReport 1,Lab Submission
Examples:
-
task -f ReportreturnsReport 1andReport Submission -
task -f lab submissionreturnsLab Submission,Report Submission
Listing all tasks: task -l
Shows a list of all the tasks in the Task Panel.
After looking up a particular task using the task -f command, let’s assume that you would like to view all the tasks
in the task panel. In that case, you can simply execute the task -l command.
Format: task -l
Assigning tasks to students: task -as
Assigns a specific task to students’ task list.
In the situation that you would like to assign a task to a particular student, you could use the command below by specifying the index of the student in the Student Panel and the index of the task to be assigned in the Task Panel.
Format: task -as STUDENT_INDEX TASK_INDEX
- Assigns the task specified at index
TASK_INDEXto the “Student” object specified at indexSTUDENT_INDEX. -
-asrefers to the “assign to student” command.
Examples:
-
task -as 2 4adds the task at the index 4 to the student at the index 2
Assigning tasks to groups: task -ag
Assigns a specific task to groups’ task list.
Let’s say you would like to assign a particular task to all the students in a class. Instead of having to assign the task to each student individually, you can directly assign the task to all the students in one go by using the command below.
Format: task -ag GROUP_INDEX TASK_INDEX
- Assigns the task specified at index
TASK_INDEXto the “Group” object specified at indexGROUP_INDEX. -
-agrefers to the “assign to group” command.
Examples:
-
task -ag 2 4adds the task at the index 4 to the group at the index 2
Unassigning tasks from students: task -unas
Unassigns a specific task from students’ task list.
Suppose you assigned a particular task to a student by accident, you can simply unassign the task by entering the command below.
Format: task -unas STUDENT_INDEX TASK_INDEX
- Unassigns the task specified at index
TASK_INDEXfrom the “Student” object specified at indexSTUDENT_INDEX. -
-unasrefers to the “unassign from student” command.
Examples:
-
task -unas 2 4removes the task at the index 4 from the student at the index 2
Unassigning tasks from groups: task -unag
Unassigns a specific task from groups’ task list.
If you wish to remove a task that has already been assigned to a class of students to reduce their workload, you could simply execute the command below.
Format: task -unag GROUP_INDEX TASK_INDEX
- Unassigns the task specified at index
TASK_INDEXfrom the “Group” object specified at indexGROUP_INDEX. -
-unagrefers to the “unassign from group” command.
Examples:
-
task -unag 2 4removes the task at the index 4 from the group at the index 2
Marking a task as done by student: task -do
Marks that a student has done a task.
Suppose a particular student has already completed a particular task assigned to him or her and you would like to track this information, you could simply indicate that the student has done the task by using the command below.
Format: task -do STUDENT_INDEX TASK_INDEX
- Marks the task specified at index
TASK_INDEXas done by the “Student” object specified at indexSTUDENT_INDEX. -
-dorefers to the “mark as done” command.
Examples:
-
task -do 2 4marks the task at the index 4 as done by the student at the index 2
Marking a task as done by group: task -dog (Coming soon)
Marks that a group has done a task.
Format: task -dog GROUP_INDEX TASK_INDEX
- Marks the task specified at index
TASK_INDEXas done by the Group object specified at indexGROUP_INDEX. -
-dogrefers to the “mark as done by group” command.
Examples:
-
task -dog 2 4marks the task at the index 4 as done by the group at the index 2
Marking a task as not done by student: task -undo
Marks that a student has not done a task.
In the case that a student has already completed a task and you would like him or her to reattempt it, you could simply indicate the task as undone by the student by using the command below.
Format: task -undo STUDENT_INDEX TASK_INDEX
- Marks the task specified at index
TASK_INDEXas not done by the “Student” object specified at indexSTUDENT_INDEX. -
-undorefers to the “mark as undone” command.
Examples:
-
task -undo 2 4marks the task at the index 4 as not done by the student at the index 2
Marking a task as not done by group: task -undog (Coming soon)
Marks that a group has not done a task.
Format: task -undog GROUP_INDEX TASK_INDEX
- Marks the task specified at index
TASK_INDEXas not done by the Group object specified at indexGROUP_INDEX. -
-undogrefers to the “mark as undone for group” command.
Examples:
-
task -undog 2 4marks the task at the index 4 as not done by the group at the index 2
Others
Viewing schedule : schedule
Views the current lesson schedule for the week.
Format: schedule
Viewing help : help
Views an info page for a list of commands and examples
Format: help
Clearing all entries : clear
Clears all entries in Tutor Master.
Format: clear
Exiting the program : exit
Exits the program.
Format: exit
Saving the data
Tutor Master data are saved in the hard disk automatically after any command that changes the data. There is no need to save manually.
Editing the data file
Tutor Master data are saved as a JSON file [JAR file location]/data/tutormaster.json. Advanced users are welcome to update data directly by editing that data file.
Archiving data files (Coming Soon)
Details coming soon …
FAQ
Q: How do I transfer my data to another Computer?
A: Install the app in the other computer and overwrite the empty data file it creates with the file that contains the data of your previous Tutor Master home folder.
Q: How do I edit lesson details of a student?
A: There is currently no functionality for that, the workaround will be to delete the lesson
first before adding it again with the new details.
Command summary
| Action | Format, Examples |
|---|---|
| Add a student |
student -a n/NAME p/PHONE_NUMBER e/EMAIL a/ADDRESS [t/TAG]… e.g., student -a n/John p/12345678 e/john@mail.com a/42 Wallaby Way, Sydney
|
| Edit a student |
student -e STUDENT_INDEX [n/NAME] [p/PHONE_NUMBER] [e/EMAIL] [a/ADDRESS] [t/TAG]… e.g., student -e 3 c/88888888 e/johnny@mail.com
|
| View a student |
student -v STUDENT_INDEX e.g., student -v 3
|
| Delete a student |
student -d STUDENT_INDEX e.g., student -d 3
|
| Find a student |
student -f KEYWORD… e.g., student -f John
|
| List all students | list |
| Add a lesson to a student |
student -al STUDENT_INDEX s/SUBJECT st/START_TIME et/END_TIME d/DAY e.g. student -al 1 s/Biology st/08:00 et/09:00 d/Mon
|
| Delete a lesson from a student |
student -dl STUDENT_INDEX LESSON_INDEX e.g. student -dl 1 1
|
| Add an exam to a student |
student -ae STUDENT_INDEX s/SUBJECT d/DATE_TIME e.g. student -ae 1 s/Math d/2021-12-20 14:00
|
| Delete an exam from a student |
student -de STUDENT_INDEX EXAM_INDEX e.g. student -de 1 1
|
| Group students |
group -a STUDENT_INDEX… n/GROUP_NAME e.g., group -a 1 3 5 n/Team2
|
| View a group |
group -v GROUP_INDEX e.g., group -v 5
|
| Delete a group |
group -d GROUP_INDEX e.g., group -d 2
|
| Add a lesson to a group |
group -al GROUP_INDEX s/SUBJECT st/START_TIME et/END_TIME d/DAY e.g. group -al 1 s/Chinese st/16:00 et/18:00 d/Thu
|
| Delete a lesson from a group |
group -dl GROUP_INDEX LESSON_INDEX e.g. group -dl 1 1
|
| Add a task |
task -a n/NAME d/DEADLINE e.g., task -a n/CS2100 Lab 1 d/2021-10-10
|
| Edit a task |
task -e TASK_INDEX [n/NAME] [d/DEADLINE] e.g., task -e 4 d/2021-12-31
|
| Delete a task |
task -d TASK_INDEX e.g., task -d 1
|
| Find a task |
task -f KEYWORD… e.g., task -f Report
|
| Assign a task to a student |
task -as STUDENT_INDEX TASK_INDEX e.g., task -as 2 4
|
| Assign a task to a group |
task -ag GROUP_INDEX TASK_INDEX e.g., task -ag 2 4
|
| Unassign a task from a student |
task -unas STUDENT_INDEX TASK_INDEX e.g., task -unas 2 4
|
| Unassign a task from a group |
task -unag GROUP_INDEX TASK_INDEX e.g., task -unag 2 4
|
| Mark task as done by student |
task -do STUDENT_INDEX TASK_INDEX e.g., task -do 2 4
|
| Mark task as done by group (coming soon) |
task -dog GROUP_INDEX TASK_INDEX e.g., task -dog 2 4
|
| Mark task as not done by student |
task -undo STUDENT_INDEX TASK_INDEX e.g., task -undo 2 4
|
| Mark task as not done by group (coming soon) |
task -undo GROUP_INDEX TASK_INDEX e.g., task -undog 2 4
|
| Schedule | schedule |
| Help | help |
| Clear all entries | clear |
| Exit | exit |